
[vc_row][vc_column][vc_column_text]
One of the most exasperating things is replacing drawer slides. You know you have to do it when you notice difficulties that spring up frequently while trying to open or close a drawer. This results in everything that’s inside the drawer spilling. However, despite the replacement process being frustrating, it’s actually an easy fix. The following are 5 simple steps you can follow if you are uncertain about the exact steps to take so you can replace your old drawers.
Gather Your Tools and Supplies
Before you begin, make sure you have all the necessary tools and supplies. You will need a screwdriver, a drill, a measuring tape, replacement drawer slides, and screws. It is important to measure your old drawer slides before purchasing replacements to ensure they are the correct size.
1) Remove the Drawer
The first and obvious step is to remove the drawer. Be careful removing it and pull it as far as it can go. Grab the front of your drawer and lift it up at a 45-degree angle. If you see this isn’t working and you aren’t able to free the drawer, then the other alternative is you can pull up on the backside of the drawer. You might still experience some difficulties if the drawer is severely stuck. If this happens, try and get drawer locks or use swing latches that don’t allow the drawer to fully come out. Most of the time, you can bypass the latches by simply pushing your drawer in slightly. Afterward, you move the latches towards the side in order to release the slides.
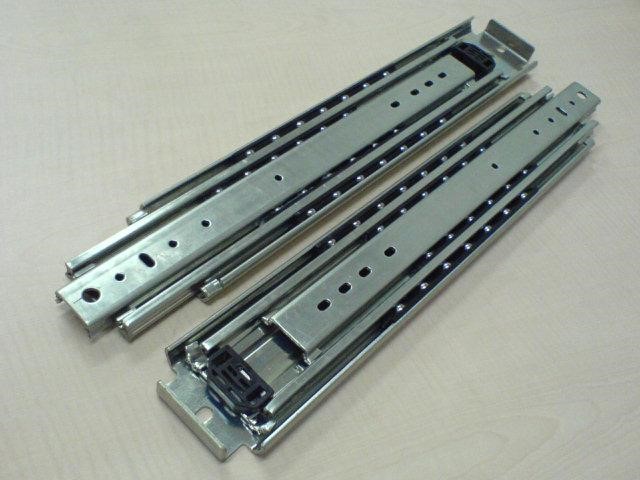
2) Remove the Old Drawer Slides
When looking at how to replace kitchen drawer slides, remove the ball bearing and all other hardware off your old drawer first. To do this successfully, you may be required to pull the drawers above as well as below in order to ensure there’s enough room to fit both your hands and screwdriver. It would be best if you kept an eye on any wheels or rollers on the back of your old drawer. To complete this task successfully, you might want to consider using either a slotted screwdriver or a Phillips head screwdriver. However, you might not need a screwdriver for some drawers; you will simply pry staples out of your drawer. Be careful not to damage the wood or strip screw holes.
3) Take Measurements for New Drawer Slides
Use a flexible tape measure to take measurements of the length of the drawers in your cabinet. Try and make a sketch where you note both the length and the width of each of the slides. When measuring the length of each side, you should measure the drawer’s box length as well. This is to ensure you know whether or not the box will be able to take in a longer slide. Typically, not all sizes are always available, so it’s essential to know if you’ll be able to be flexible. Try and get high-quality drawer slides that aren’t outdated, and they should also have a longer service life. Something else you should ensure is they don’t slide stiffly.
4) Buy New Drawer Slides
After getting the measurements of your old slides, look for new slides with the correct measurements. You can get the proper measurements by measuring the depth of the drawer. Remembering that deviations of 0.7in/20mm-1in/30mm are suitable will help you get the correct measurement.
Consider Upgrading to Ball Bearing Drawer Slides
If you are replacing your old drawer slides, it may be a good time to consider upgrading to soft close drawer slides. These slides use ball bearings to create a smooth and quiet opening and closing motion. They are also more durable and can hold more weight than traditional slides. You can purchase ball bearing drawer slides and replacement parts at most hardware stores.
5) Install New Glides
The final step is installing the new glides; then, you will be all done. When installing, work on one drawer at a time. Ensure all the glides are aligned adequately before installation. The first step is to layer the glides out over the drawer box and also in the drawer. It’s important to note that the right sides should be lined up with right slides, and the left slides should be lined up with left slides. To make the process easier, check the markings that show front and back. Take the slides and attach them to the drawer box inside the cabinet you’re working on first. Use the measurements you took as a reference to ensure they’re level. Then screw the glides in, and your mission is complete.
Regular Maintenance
To prevent your drawer slides from becoming worn out or damaged in the future, it is important to perform regular maintenance. This includes cleaning the slides and lubricating them with a silicone-based lubricant. This will help keep your slides functioning properly and extend their lifespan.
By following these steps, you can easily replace old drawer slides and keep your tool box in top working condition. Remember to measure your old slides before purchasing replacements and consider upgrading to ball bearing slides for a smoother and more durable option. With regular maintenance, your tool box will continue to serve you well for years to come.
Conclusion
Despite being considered a hectic process by many, changing drawer slides isn’t so hard. With the right equipment, you don’t need help from anyone and you certainly do not need to pay someone to do it for you. Following the above correct steps, one after another saves you both time and money. The above guide includes 5 of the most useful tips when it comes to replacing drawers.[/vc_column_text][/vc_column][/vc_row]