
European Hinge Replacement Guide
There are several steps taken when replacing European hinge cabinets. The hinges come in different sizes. Ensure the right size is fitted to the cabinets during the replacement process. Some manufacturers have unique features on the hinges that make them work well for certain interior designs. During the replacement process, the hinges may require sticking to certain brands. Get the right hinges before the replacement process starts. Shopping online for the European hinges is easy. Several reputable sellers can avail top quality hinges. Know the right places to order the hinges for the best experience. Take measurements of the hinges and even photos to compare with those available online. Getting the right replacement hinges is a great step towards getting the best results.
Here are some steps to take during the replacement European cabinet hinges process:
1. Check the brand names
Getting the brand of the hinge that was previously used will make the cabinets work well. If it is a must to get a different brand, then ensure to replace both hinges even if the other is in good working condition. The different brands will tend to vary. After checking out the brand, ensure the place where to buy the hinges offers the best deals. A quick review of the several online sellers can make it easy to get the best deals.
2. Take measurements of the hinges
The hinges come in different dimensions. Ensure the different dimensions of the kitchen cabinet have been captured so that when shopping for the hinges, it will be easy to locate the perfect fit. Some of the measurements to take include the overlay of the cabinet and the DBE. It is essential to take measurements because it will go a long way towards choosing the perfect kitchen cabinet hinges.
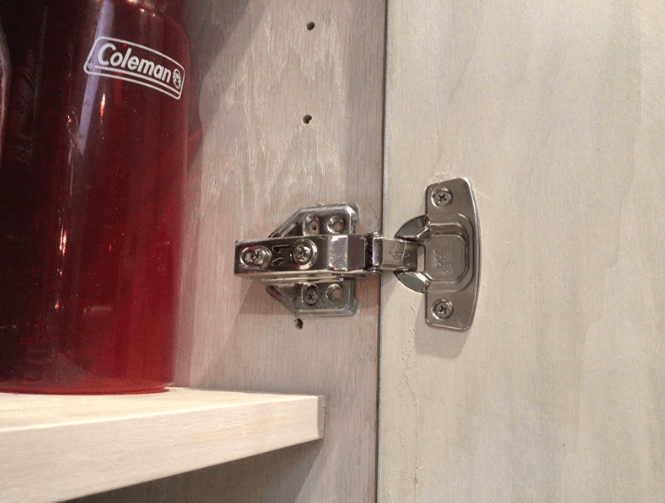
3. Unscrew the hinge from the cabinet
After the hinges have been delivered, the next step is to embark on the replacement European cabinet hinges process. It starts with the removal of old hinges that have failed. Use a screwdriver to unscrew the hinges from the cabinet. The hinges can be fastened to the cabinet using different types of screws. Check out the screw head to get the right screwdriver for the job. It may require the application of force, but finally, the screws will come out. Ensure to hold the door in place when unscrewing the hinges to avoid the door from falling. Unscrew all the screws from the kitchen cabinet to remove the door.
4. Remove the cabinet door
After the screws that attach the door to the cabinet frames are removed, the door will easily get out. Remove the odor and place it on a flat surface. Inspect its condition to know whether it needs any further repairs. It is essential to handle the cabinet door with care and avoid cases where it can come into contact with rough surfaces that interfere with the smooth finish. For example, when handling acrylic cabinet doors, ensure the surfaces do not develop scratches.
5. Unscrew the hinge from the door
After the kitchen cabinet door has been placed on a flat surface, the next step is to remove the remaining screws from the kitchen cabinet door. Use a screwdriver to get them out. For the case of replacing only one hinge, then the other may be left intact. Use a screwdriver to unscrew the hinges carefully. Avoid too much force because it can widen the screw holes and make the door start shaking after it has been returned to its position. Take few minutes to inspect the door and ensure it does not have any damages that may be of concern later. The process of replacing the hinges is easy. Provided all the necessary materials are available, it becomes easy to replace the hinges.
6. Screw new hinges to the cabinet door
Now it is time to get new screws into place. Choose the right size of the screws to have in place. The hinge screw hole will determine the screws. The surfaces here to attach the hinges to the cabinets should not have developed scratches or cracks; if there are cracks, then start by treating them before reinstalling the cabinet doors. It can take more time because it will require kitchen cabinet repair. Remember, it is always easy to repair the kitchen cabinet rather than buying a new unit. If the damage is beyond your capability, then hiring an expert is essential. Some kitchen cabinets come with a warranty; check out the terms and conditions of the warranty before starting the repair process. Experts better handle some projects to realize the perfect finish. Ensure the new hinges that are used are of the highest quality. They should last longer to guarantee value for money. Several reasons can lead to the failure of the hinges. Check out the possible cause and address it before replacing the hinges. It is essential to avoid incidences where the new hinges will fail due to the same reason.
7. Replace the cabinet door and ensure a tight fit
After checking out the hinges and ensuring they are well screwed to the door, return the door to its original position. It should leave the same spaces between the cabinets. The measurements taken during the cabinet door inspection can help ensure the same alignment is achieved. The cabinet doors are installed to achieve a certain level of alignment; they should be adhered to avoid cases where they will end up failing.
8. Screw the hinge to the cabinet
The final step to take involves screwing the hinges back to the cabinet. Use a screwdriver to drive the screws slowly. Too much force can crack the wood. Test the door after all the screws have been tightened. During the tightening process, avoid too much tightening because it can lead to cracks. The door should open and close easily.
The processing or replacing kitchen cabinet hinges is easy. Follow the steps we have outlined, and the project will be accomplished at home without hiring an expert for the installation process.