
How To Determine Installation Height For Kitchen Cabinets
A beautiful kitchen demands more than just elegant cabinets. The distinction between shoddy work and one that looks good is an appropriate setup. The length of a cupboard isn’t necessarily a given. Measuring, leveling, and unusual situations are all factors to know, and many homeowners hire a cabinetmaker to create custom sizes. It takes time to get it properly, but the work is well worth it. There are many things you must determine before installing the cabinets.
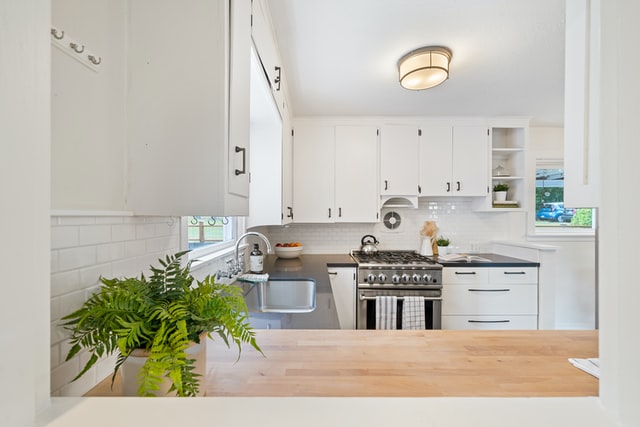
Here are the 2 categories of kitchen cupboards you’ll need, and all the elements to think:
Base Cabinets
There are two types of base cabinets: conventional and bespoke. The standard length of a base cabinet is 34.5 inches. However, such a dimension does not take into consideration the inclusion of a countertop. You should keep in mind that flat ground is uncommon, so you’ll have to alter the Cabinetry to make everything even. If you don’t do this, the cupboards will rest at various elevations as the dips and bends of the floor change, making the floor appear uneven. Under cupboards, shims are utilized to keep everything level.
In some circumstances, taller or smaller cabinets are required.
Based on the people, these counters should be roughly 28 inches tall. Wall cabinets are then custom-shortened to the required height. Many people also have to deal with issues that make leaning forward too difficult. In that situation, a base cupboard would be lifted to their shoulder width, allowing them to use the countertop without bending down.
Upper Cabinets
These cabinets should be lower enough for many people to access the first or second shelves, yet tall enough for objects to be stored beneath them.
The ideal spot is roughly 18 inches, although it’s normally around 15 inches designed with accessibility in mind. the most important aspects of upper cabinets are if they touch the roof. Even if they appear to reach the roof, most cupboards will not go that far.
Installers can construct and fit bespoke cupboards that go all the way to the roof in the kitchen with large windows, or upon personal order, to provide more space for items that aren’t used as frequently. Some cupboards will need to be custom-made to fit a smaller space. Above-the-fridge cabinets, sink shelves, and range shelves all fall into this category.
These cupboards must all be positioned with the tops of normal cabinets to maintain the same elevation.
Height of Special Base Cabinets
The width of the countertop reduces the height of the base cabinet. If you have a condition that stops you from bending, an ordinary countertop level is insufficient. A 35-inch cupboard will only function in these situations if the tabletop is flexible and can be elevated. A taller base cabinet is the finest alternative. To minimize bending, find the proper countertop level by assessing up from the ground to the user’s arm, then subtracting the countertop width from the cupboard height.
Installation Tips
Begin by determining the height of the wall cabinets. Cabinetry in the sale is typically 34-1/2″ high. Remember to add 1-1/2″ to the tabletop or 18 inches to the regular backsplash. At a 54-inch line, draw a straight line around the wall with your pencil. Be sure the line is straight by using a ruler. Even cupboards will be hung using it as a reference.
Next, identify wall screws with a stud locator. To attach cupboards that are solid and well maintained, you must first locate the wall screws. Make sure you don’t tamper with any electric and plumbing in the process.
Using the screws you’ve pre-located, place a ledger block on the pencil-drawn mark. During the installation phase, this acts as a convenient support system for installing cabinets.
From the upper cabinets, replace all covers and hardware. Mark all of the parts so that they can be easily returned to their proper places when the moment arrives. Wall cabinets are lightweight and installation is simple when clunky accessories are removed.
Now it’s time to put the wall cupboards up. Attach cupboards based on how many you may securely lift and place utilizing the ledger plank at one time.
Use predefined studs to attach cupboards to the ground, but after you’re sure they’re level. If there is a space between the ceiling and the last cupboard, use a filler piece to cover it. You will have to estimate, mark, chop, and attach the filler piece before fixing the completed cabinet.